I collected four prints that would fit a paleontology theme. In evolutionary order: sharks (fish), frogs (amphibians), turtles (reptiles) and dinosaurs. I found some "scales" to use as the backing and use along with a few basic colours for the accent parts of the quilt.
I looked at a number of patterns but was not satisfied with any of them. They were too "organized." Craig is many things, but organized is not one of them. Once again, I decided to go "no rules" and make something up that would suit him and amuse me.
The Concept
Dinosaur fossils are found in sedimentary rock. If you know anything about geology, you know that sedimentary rock is formed by layers of eroded material - oldest layers are at the bottom, newest on top. When animals die, in the right conditions, their bones fossilize as the sediments are deposited on the remains.
If you look at this quilt, you'll see the "sedimentary layers" represented in the big block lower centre left. Sharks at the bottom (oldest), dinos at the top (youngest).
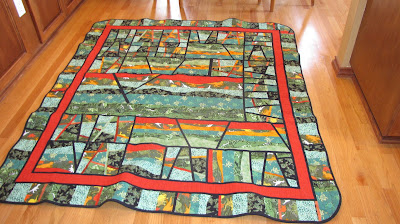
 When geological events occur, the sedimentary bedrock is shifted, broken up, rearranged. Hence the "broken" blocks that surround the "sedimentary bedrock."
Technique
Block Creation
To develop the bigger blocks (as per above), I used a technique that is called "freehand curves" in one of my books. I cut strips of various widths of the fabric I wanted to use, then stacked two together, right side to wrong side (or put another way, right sides facing up), and free-handed a long shallow curve through both pieces. The left side of one would fit perfectly with the right side of the other, and vice versa. I built the layers in the block this way. Then I sliced that big block at random angles in a few places and stitched the black strip into place after offsetting the layers a bit. I was working with 8 inch blocks, so cut the big blocks down to multiples of 8 (plus seam allowances and the 1/2 inch strips between the 8 inch blocks).
The tip I can offer for the curves is to not make them too deep. Shallow curves will go together very easily with no clipping - deeper ones will take a bit more work and may pucker a bit even with clipping.

 To make the eight inch blocks across the top row (above), I cut nine inch blocks of each of the five prints (dinos, sharks, turtles, frogs and scales), stacked a set of each print right side to wrong side (all right sides up again), then randomly sliced at an angle twice in each direction. This created nine pieces for each print. With only five prints, that meant there would be two repeats in each block so the rule was to rearrange the pieces so that a print was not adjacent to itself. I stitched in the strips - mostly black, but some other colours to mix it up a bit - then re-cut each block to 8 inches. This technique is described in many books, so I won't dwell on it here.
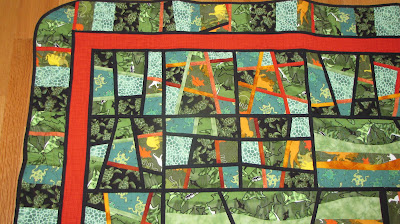

A word about the strips, as I was asked how I did them. I cut 1 inch strips, then stitched them in with 1/4 seam allowances, which meant they ended up being 1/2 inch wide. There are a couple of exceptions because I had some wider strips already cut from another project and I was too lazy to trim them down - see if you can find them! (You might have to go back to the first pix.)
Quilting
Assembling this quilt was a challenge for me. My "no rules" approach resulted in a quilt that was a bit larger than I expected and it was awkward for me to get the three layers together. I spent a couple of hours crawling around on the floor on hands and knees. I could hardly walk the next day! Next time I'm going to tap Kristie to accompany me to the local quilt shop where they apparently have a large table available for such things.
Part of the fun of this project was experimenting with quilting. First, I stitched down the centre of the 1/2 inch strips. I wanted to try some freehand quilting in the larger block areas. I don't have a proper foot for my machine to do freehand stitching, so I used no foot, lowered the feed-dogs and reduced stitch length to zero.
My first attempt resulted in very long, jerky stitches (frogs, below).
 I realized that I needed to speed up the machine and slow down the fabric movement. This resulted in much better stitch length and a smoother pattern. I didn't actually have a "pattern" - I just kept moving the fabric around. See the green, below - much better!
 I liked the big sharks with the white teeth, so I avoided quilting them to keep them "pristine."
 Same with the big dinos.
 Below, I was trying a zigzag pattern.
 I also tried a sort of boxy design in a few places, and around the red border.
 I used green thread on the bobbin for everything as the backing is the green scales. It took me awhile to decide that the top thread tension should be relaxed a bit so the green would not pull through where it shouldn't. This is the good thing about experimenting on a quilt for your kid - he won't notice the little boo boos (unless he reads this, of course!) In which case, Craig, I will be making you another quilt sometime in the future when I've figured out these little things.
Border and Backing
I thought it would be nice to frame the blocks, so decided red would make everything "pop." I sliced off 2.5 inch strips, only to discover that I should have paused a moment to be sure the fabric was still square. I ended up with a few waves. I re-cut the worst, but should have re-cut all as the quilt still has a few "waves" around the edge - but again - it's a learning and with luck, Craig will still love me! :) So my tip for this is when you are cutting something that you need LONG strips for, stop long enough to square the fabric BEFORE you cut.
I used up the remaining "sedimentary curves" bits and stitched more of the five prints together to add a second border. I quilted the print border with long wavy lines, trimmed the whole thing and rounded the corners.
For the binding, I cut 2 inch black strips, stitched them together and pressed them through my 1 inch bias tape maker. Being lazy and wanting to get the thing finished, I machine stitched the binding around the quilt edges. Again - it's not a detail Craig will care about. He will be able to "manhandle" it and I won't worry about it coming apart. It's all been pre-washed, including the batting, so he can wash it and it should be fine.
 Final Note
Aside from the "learnings" I described above, I also learned that this quilt is about as big as I'll be able to handle in terms of quilting on my machine. I have a Phaff 1471 - it's about 25 years old and not designed for quilting - it's just a "regular" sewing machine. I found it very difficult to get the quilting done in the central part of the quilt. I'm not ready to spring for a new machine at this stage, but will have to consider alternatives (such as hand quilting) when it comes to making anything bigger than this in the future.